
This was done mainly for fun, since this isn't really baking or cooking or anything near that, but instead a little decorative detail). But I really hope someone can use this to make something much better than this mess I came up with
I got the job of making the dessert for Eurovision tonight, and I thought that I may as well make a little "happy birthday RPR" ish out of one of them.
But since my cooking skills is scraping the bottom, I decided to make something a little different

(There's a flag on the side of the RPR one, just to make it a little more birthday-ish)
It was made with simple icing on a few drinking glasses

Just mix the ingredients(Powdered sugar, water and some food colour) up and find something thin to write with, I used a bamboo stick I had, and write or draw something on the inside. Then put them in the fridge for half an hour, and they should be good to go.
Remember that words needs to be written mirrored.
Make sure your drinking glasses are laying on the side like this to prevent the icing from dropping to the bottom of the glass. I shifted between glasses to give them a little time to dry while making the others.

I choose to fill the glasses with Eton Mess, but it can be filled with pretty much anything. (If you're going to use liquid you may need to experiment a little bit for yourself, since I haven't tried with liquid yet, and the icing will probably get washed away)

(The pictures are horribly, I know)
I got the job of making the dessert for Eurovision tonight, and I thought that I may as well make a little "happy birthday RPR" ish out of one of them.
But since my cooking skills is scraping the bottom, I decided to make something a little different
(There's a flag on the side of the RPR one, just to make it a little more birthday-ish)
It was made with simple icing on a few drinking glasses
Just mix the ingredients(Powdered sugar, water and some food colour) up and find something thin to write with, I used a bamboo stick I had, and write or draw something on the inside. Then put them in the fridge for half an hour, and they should be good to go.
Remember that words needs to be written mirrored.
Make sure your drinking glasses are laying on the side like this to prevent the icing from dropping to the bottom of the glass. I shifted between glasses to give them a little time to dry while making the others.
I choose to fill the glasses with Eton Mess, but it can be filled with pretty much anything. (If you're going to use liquid you may need to experiment a little bit for yourself, since I haven't tried with liquid yet, and the icing will probably get washed away)
(The pictures are horribly, I know)

These all look awesome guys! 

Here are my medieval recipes for crispels and hippocras.

Hippocras!
Hippocras encompasses any number of drinks made by mixing wine, honey or sugar, and spices. It sometimes was said to have medicinal properties--aiding in digestion, etc. It's a drink that's amazing both hot and cold. This blend is my own recipe I've developed after making it a many times in the past!
Ingredients:

1 bottle dry red wine (I've gotten good results with pinot noir and merlot--I used Blackstone merlot here and it was fantastic)
1 cup honey
1 thumb-sized ginger root, peeled and chopped
1 clementine or half an orange
4-5 cinnamon sticks
1 tsp. whole allspice pods
1 tbs. cloves
1 tsp. anise seeds
1/2 tsp. black peppercorns
pinch of red pepper flakes (TINY PINCH)
pinch of fennel seeds
(I didn't have any whole nutmegs, but if I did, I would have thrown a couple in as well)
Notes:

Pour the bottle of wine into a saucepan and put it on medium low heat for 5-10 minutes, until hot. It'll start to bubble a little, but you don't want a boil.


Stir in the honey--since the wine is hot, the honey will blend more easily into it. (In the pictures, I accidentally added the chopped ginger first. Oops. But it doesn't really matter.)

I like to rinse the measuring cup in the wine to get off as much of the honey as I can, as not to waste it. And because SWEET.

Peel a thumb-sized piece of ginger. The more ginger, the spicier the hippocras!

Chop.

Get it pretty fine, but not so fine that it'll go through your strainer.


Add all the spices and ginger root. Yup! (Note how little red pepper I'm adding. It and the ginger will make it quite spicy.)

Peel the orange. If you have a zester, zest it into the wine--just don't add the peel itself. Orange peel can be delicious when properly caramelized, but when steeped in the wine, it will just get bitter.

Chop the orange to release the juices but don't puree it, and add it to the pot.

Simmer on low or medium low for 45 minutes, stirring frequently. Taste it as you go and add more honey or spices as you prefer.


At this point your hippocras is done! Strain it into goblets (regular cups will do in a pinch, I suppose) and serve hot. (Fun fact--this silver chalice isn't actually great choice for an acidic wine. Glass or ceramic is better.)

For storage and/or chilling, let it cool to room temperature, then put a funnel in the empty wine bottle. Put a strainer over the funnel and pour the pot of hippocras in. Remember, while some of the wine evaporated, you also added a lot of honey, so watch out for overflow. (I, uh, didn't have a lot left over.) Cork and throw it in the fridge. It keeps for a long time. When cold, it has a syrupy texture and the bitter, tannic wine flavor is reduced.
Hippocras
Hippocras encompasses any number of drinks made by mixing wine, honey or sugar, and spices. It sometimes was said to have medicinal properties--aiding in digestion, etc. It's a drink that's amazing both hot and cold. This blend is my own recipe I've developed after making it a many times in the past!
Ingredients:
1 bottle dry red wine (I've gotten good results with pinot noir and merlot--I used Blackstone merlot here and it was fantastic)
1 cup honey
1 thumb-sized ginger root, peeled and chopped
1 clementine or half an orange
4-5 cinnamon sticks
1 tsp. whole allspice pods
1 tbs. cloves
1 tsp. anise seeds
1/2 tsp. black peppercorns
pinch of red pepper flakes (TINY PINCH)
pinch of fennel seeds
(I didn't have any whole nutmegs, but if I did, I would have thrown a couple in as well)
Notes:
- If you want a more historical hippocras, exclude the allspice and red pepper, and swap the clementine for a pear or plum. A poor person's hippocras might also exclude some of the costlier spices.
- You could use a sweet wine, but since we'll be adding a boatload of honey, dry is probably better. You could also probably use a white or rose wine! I've never tried it!
- Use this recipe to make mulled mead, too. Just exclude the extra honey!
- Any of these whole-pod spices can be replaced with their more common ground forms, but beware: this will make it more difficult to strain, and will result in a drink with more sediment at the bottom.
- Cinnamon is a key flavor profile in hippocras, so sometimes I'll add ground cinnamon as well as the sticks.
Pour the bottle of wine into a saucepan and put it on medium low heat for 5-10 minutes, until hot. It'll start to bubble a little, but you don't want a boil.
Stir in the honey--since the wine is hot, the honey will blend more easily into it. (In the pictures, I accidentally added the chopped ginger first. Oops. But it doesn't really matter.)
I like to rinse the measuring cup in the wine to get off as much of the honey as I can, as not to waste it. And because SWEET.
Peel a thumb-sized piece of ginger. The more ginger, the spicier the hippocras!
Chop.
Get it pretty fine, but not so fine that it'll go through your strainer.
Add all the spices and ginger root. Yup! (Note how little red pepper I'm adding. It and the ginger will make it quite spicy.)
Peel the orange. If you have a zester, zest it into the wine--just don't add the peel itself. Orange peel can be delicious when properly caramelized, but when steeped in the wine, it will just get bitter.
Chop the orange to release the juices but don't puree it, and add it to the pot.
Simmer on low or medium low for 45 minutes, stirring frequently. Taste it as you go and add more honey or spices as you prefer.
At this point your hippocras is done! Strain it into goblets (regular cups will do in a pinch, I suppose) and serve hot. (Fun fact--this silver chalice isn't actually great choice for an acidic wine. Glass or ceramic is better.)
For storage and/or chilling, let it cool to room temperature, then put a funnel in the empty wine bottle. Put a strainer over the funnel and pour the pot of hippocras in. Remember, while some of the wine evaporated, you also added a lot of honey, so watch out for overflow. (I, uh, didn't have a lot left over.) Cork and throw it in the fridge. It keeps for a long time. When cold, it has a syrupy texture and the bitter, tannic wine flavor is reduced.
Crispels!
Crispels are a very simple dessert that are basically fried bits of pie crust covered in clarified honey. They would have been a relatively common dessert, and though the original medieval recipe doesn't call for it, I've dolled it up with some spices. You could also mix cinnamon or cardamom right into the dough!
Ingredients:

1.25 cups all purpose flour
1 stick butter, cold
ice water
honey
olive oil
aniseed, cloves, allspice, and cinnamon
Start by making the dough. This is a very standard pastry dough recipe that also works for crusts. I've figured out some tips to getting it nice and fluffy.

Prep some ice water. Having about a cup is ideal--this wasn't quite enough.

Make sure the butter stays cold. I chop it using a sharp knife.

Make the chopped chunks as close to pea-sized as you can.

Dip your fingers in the ice water to lower their temperature.

Combine flour and butter. Add a little salt if your butter is unsalted. Mix with your cold fingers and try to get the butter into smallish chunks, but again, keep it as cold as possible. Then add ice water a tablespoon at a time until the dough holds together when you squeeze it.

Flour your countertop and knead the dough a little. Smash it with your palms to flatten it partway then ball it back up a few times. Again, don't overwork it, and every so often chill your fingers again.

Ball it, bag it, and chill it in the fridge for an hour or more.

Flour your surface and a rolling pin and roll out the dough as flat as possible.


Cut out small circles. I used a tiny cup--I floured it, pressed the rim into the dough, and twisted to separate the circle from the rest of the dough. Set the circles aside.

You'll have scrap dough left over. Roll it out again and keep it up until you've turned as much of it into circles as possible.

Pour olive oil into a saucepan. Aim for it to be between half a cm and a cm deep. Turn on the heat to medium.

Cover a plate in paper towels. This is where you'll set the crispels when they're done frying, so some of the oil gets absorbed.

Lay the crispels in the oil to fry until golden brown. I cooked them maybe about 4 minutes on one side, flipped them with a fork, then 4 on the other--but you can go more or less. I just kinda winged it.

While they're cooking, throw some aniseed, cloves, and whole allspice into a mortar and grind it finely with a pestle. If you don't have a mortar and pestle, go ahead and use pre-ground spices!

This batch turned out a little dark.

Fish them out of the oil and onto the paper towel covered plate. You can pat them with another paper towel to absorb more of the oil.

Also while they're cooking, heat up some honey until bubbly. I used maybe a quarter or half a cup and had plenty left over.


Spoon (or use a pastry brush) the honey over the crispels.

Sprinkle on your spice blend and dust with cinnamon.

Enjoy!
Crispels are a very simple dessert that are basically fried bits of pie crust covered in clarified honey. They would have been a relatively common dessert, and though the original medieval recipe doesn't call for it, I've dolled it up with some spices. You could also mix cinnamon or cardamom right into the dough!
Ingredients:
1.25 cups all purpose flour
1 stick butter, cold
ice water
honey
olive oil
aniseed, cloves, allspice, and cinnamon
Start by making the dough. This is a very standard pastry dough recipe that also works for crusts. I've figured out some tips to getting it nice and fluffy.
Prep some ice water. Having about a cup is ideal--this wasn't quite enough.
Make sure the butter stays cold. I chop it using a sharp knife.
Make the chopped chunks as close to pea-sized as you can.
Dip your fingers in the ice water to lower their temperature.
Combine flour and butter. Add a little salt if your butter is unsalted. Mix with your cold fingers and try to get the butter into smallish chunks, but again, keep it as cold as possible. Then add ice water a tablespoon at a time until the dough holds together when you squeeze it.
Flour your countertop and knead the dough a little. Smash it with your palms to flatten it partway then ball it back up a few times. Again, don't overwork it, and every so often chill your fingers again.
Ball it, bag it, and chill it in the fridge for an hour or more.
Flour your surface and a rolling pin and roll out the dough as flat as possible.
Cut out small circles. I used a tiny cup--I floured it, pressed the rim into the dough, and twisted to separate the circle from the rest of the dough. Set the circles aside.
You'll have scrap dough left over. Roll it out again and keep it up until you've turned as much of it into circles as possible.
Pour olive oil into a saucepan. Aim for it to be between half a cm and a cm deep. Turn on the heat to medium.
Cover a plate in paper towels. This is where you'll set the crispels when they're done frying, so some of the oil gets absorbed.
Lay the crispels in the oil to fry until golden brown. I cooked them maybe about 4 minutes on one side, flipped them with a fork, then 4 on the other--but you can go more or less. I just kinda winged it.
While they're cooking, throw some aniseed, cloves, and whole allspice into a mortar and grind it finely with a pestle. If you don't have a mortar and pestle, go ahead and use pre-ground spices!
This batch turned out a little dark.
Fish them out of the oil and onto the paper towel covered plate. You can pat them with another paper towel to absorb more of the oil.
Also while they're cooking, heat up some honey until bubbly. I used maybe a quarter or half a cup and had plenty left over.
Spoon (or use a pastry brush) the honey over the crispels.
Sprinkle on your spice blend and dust with cinnamon.
Enjoy!

Oh, man, there are so many beautiful and tasty-looking things here! Fantastic job so far, everyone!
My entry is still a work-in-progress; I just finished up day 2 of working on it. I'm just laughing at my hands, though, so you get a WIP shot:

They look like a giant bruise, and like I haven't been down off the Wall to be able to clean my fingernails all winter. This is after I've washed them about five times already.
Time for some sleep! And then back to work.
My entry is still a work-in-progress; I just finished up day 2 of working on it. I'm just laughing at my hands, though, so you get a WIP shot:
They look like a giant bruise, and like I haven't been down off the Wall to be able to clean my fingernails all winter. This is after I've washed them about five times already.
Time for some sleep! And then back to work.

@ Heimdall - wonderful post! I finally know what those words mean!
The third post from my series on forgotten ingredients will tell you about... bacteria! And their culinary uses. I promise a recipe is involved.
Nowadays, when we want to preserve food, we often kill the bacteria. But canning was only invented 1790. So what did the people do before that?
Well, there was drying, and preserving food using salt. Placing stuff into the cellar, where the average temperature might have been 11 C or 52 F, also helped. But it wasn't like today's fridges and freezers. So what did they do? Well, they let their bacterial friends take care of things.
If you know sauerkraut, you are familiar with a product of lactofermentation - a process in which bacteria create lactic acid, which gives the food a pleasantly sour flavour and prevents harmful bacteria from developing, thus preserving the food. Which is what you want if you aren't able to import fresh produce in winter and you have to do with whatever you harvested over summer and autumn.
But there was more to bacteria than food preservation (and by food I mean also fruits and meats and fish, baked goods and grains and legumes, not only vegetables). It was used to create new meals from the same old ingredients, thus adding variety to the diet. Ketchup, for instance, used to be a fermented sauce.
And finally, if you let bacteria pre-digest your food (icky!), they'll make the digestion much easier for you. Plus they'll generate a bunch of vitamins in the process that wouldn't be there at all without them. Which is pretty cool if you don't have a convenience store nearby to buy fresh fruits and vegetables from even in January. This is important because the fermented food can spoil pretty easily if you don't know what you're doing - it's alive and therefore unpredictably dependent on things like air temperature and water quality and exposure to whatever is nearby - and once it has spoiled that's it. Stuff like sauerkraut was made and stored in large batches, and if yours spoiled... well, you had a chance to try again next year.
In fact, it was essential that in places where new supplies weren't readily available, the people (usually women) responsible for feeding the household knew what they were doing in terms of food storage for many months ahead, food preservation, and preparation, and these skills took many years to learn. They were essential for survival in many times and places, and therefore invaluable. It definitely wasn't as easy as reading a cookbook. Which I'm about to demonstrate here
Behold... My recipe for a probiotic cabbage and carrot salad!
Ingredients:
a small head of cabbage
4 carrots
non-chlorinated water (chlorine would kill the bacteria)
salt (sea salt is best)
spices of choice (mustard seeds, caraway, bay leaves, coriander seeds)
Equipment:
a jar or two to take it all in
something to prevent the vegetables from floating up and coming into contact with oxygen (I'm using a glass, but you can also buy specialty equipment)
a container to catch any overflowing liquid
Method:
Uh... yeah, that's it as far as important warnings go. It definitely shouldn't smell off or taste weird or mouldy.
Less importantly, it'll probably make the room where you are making it smell... not too nice") But it's survivable.
But it's survivable.
Here's my jar in about 1,5 or 2 days into the fermentation. I think you can see the bubbles of carbon dioxide forming:

(they're in the middle of the glass, under some cabbage leaves)
And here's the finished salad:

Cabbage is usually kneaded and packed into a jar, but I wanted a less laborious thing that would work as a salad, so I made this. Surprisingly, it works - it's a pleasantly tangy flavour, as if you had added vinegar and a bit of sugar in it. Since it's not too labour-intensive, it's a great ferment for a first try - no big deal if it spoils!
People also ingested bacteria with almost every meal because things weren't washed as much as they are nowadays. Funnily enough, there are about an equal amount of bacterial cells in each of our bodies as there are human cells. So we're all 1/2 human and 1/2 bacterial! There are some new emergent theories nowadays that suggest that the lack of consumption of many strands of beneficial bacteria every day is an underlying cause of many a modern health problem. Here's a link to a book which I haven't read but which has a funny name (and good reviews, but I'm linking to it because of the name ) if you're interested in learning more.
The third post from my series on forgotten ingredients will tell you about... bacteria! And their culinary uses. I promise a recipe is involved.
Nowadays, when we want to preserve food, we often kill the bacteria. But canning was only invented 1790. So what did the people do before that?
Well, there was drying, and preserving food using salt. Placing stuff into the cellar, where the average temperature might have been 11 C or 52 F, also helped. But it wasn't like today's fridges and freezers. So what did they do? Well, they let their bacterial friends take care of things.
If you know sauerkraut, you are familiar with a product of lactofermentation - a process in which bacteria create lactic acid, which gives the food a pleasantly sour flavour and prevents harmful bacteria from developing, thus preserving the food. Which is what you want if you aren't able to import fresh produce in winter and you have to do with whatever you harvested over summer and autumn.
But there was more to bacteria than food preservation (and by food I mean also fruits and meats and fish, baked goods and grains and legumes, not only vegetables). It was used to create new meals from the same old ingredients, thus adding variety to the diet. Ketchup, for instance, used to be a fermented sauce.
Click here for an example with oatmeal
(source: http://www.westonaprice.org/health-topics/the-good-scots-diet/)
Quote:
Another common preparation of oat porridge in the Scottish kitchen included the farm wife cooking a large pot of porridge early in the week that would be poured into the drawer of the kitchen cupboard and left to cool and congeal. All week, family members would cut a slice to take with them to the fields and eat cold under its new name, calders. Certainly the calders soured pleasantly as the days went by. Slices were also fried in butter to accompany fish or eggs.
And finally, if you let bacteria pre-digest your food (icky!), they'll make the digestion much easier for you. Plus they'll generate a bunch of vitamins in the process that wouldn't be there at all without them. Which is pretty cool if you don't have a convenience store nearby to buy fresh fruits and vegetables from even in January. This is important because the fermented food can spoil pretty easily if you don't know what you're doing - it's alive and therefore unpredictably dependent on things like air temperature and water quality and exposure to whatever is nearby - and once it has spoiled that's it. Stuff like sauerkraut was made and stored in large batches, and if yours spoiled... well, you had a chance to try again next year.
In fact, it was essential that in places where new supplies weren't readily available, the people (usually women) responsible for feeding the household knew what they were doing in terms of food storage for many months ahead, food preservation, and preparation, and these skills took many years to learn. They were essential for survival in many times and places, and therefore invaluable. It definitely wasn't as easy as reading a cookbook. Which I'm about to demonstrate here
Behold... My recipe for a probiotic cabbage and carrot salad!
Ingredients:
a small head of cabbage
4 carrots
non-chlorinated water (chlorine would kill the bacteria)
salt (sea salt is best)
spices of choice (mustard seeds, caraway, bay leaves, coriander seeds)
Equipment:
a jar or two to take it all in
something to prevent the vegetables from floating up and coming into contact with oxygen (I'm using a glass, but you can also buy specialty equipment)
a container to catch any overflowing liquid
Method:
- Pour some boiling water into your jar and over whatever it is that you'll be using to prevent your vegetables from making it to the top of your jar.
- Boil some unchlorinated water.
- Prepare your seeds. You'll probably need at least a teaspoon per 1-quart jar.
- Wash your cabbage and halve it. Then cut out the stem from each of the halves. Cut it in pieces, like this:

I guess this also tells you what to do with your (peeled) carrots. - Sprinkle your seeds over your veggies and stuff it all in the jar. Leave some room on top.

Notice something missing? Yes, I forgot the seeds! They're not compulsory, but they do add an extra protection against the whole batch spoiling. - Put 1-3 teaspoons of salt on top of it all, depending on your jar size and how salty you like things. I used 2,5 tsp for 0,7 litre and I would use less next time. Having some salt prevents harmful bacteria from multiplying, but just how much you use doesn't matter.
- Remember that non-chlorinated water you boiled? Pour it over the veggies!
- Make sure air can't get in and any liquid that'll want to overflow is caught. Here's what I did:

- Keep at room temperature. It actually starts being mildly probiotic a few hours after you make it, so if you aren't used to fermented foods, you might like to taste it continually - I tasted it on day 1, day 2, and day 3 when first making it. I liked the day 3 result the best and refrigerated it at that point - refrigeration will stop further fermentation.
- It's really important that it tastes good. If it doesn't, don't eat it! If you aren't experienced it might have spoiled (=the non-beneficial bacteria multiplied in more successfully than they should have). If you don't know how fermented food is supposed to taste like, buy some traditionally-made sauerkraut from a store for comparison (but note that it will most likely have been pasteurised, thus killing all the bacteria in it after the fermentation was over).
Uh... yeah, that's it as far as important warnings go. It definitely shouldn't smell off or taste weird or mouldy.
Less importantly, it'll probably make the room where you are making it smell... not too nice
But it's survivable.Here's my jar in about 1,5 or 2 days into the fermentation. I think you can see the bubbles of carbon dioxide forming:
(they're in the middle of the glass, under some cabbage leaves)
And here's the finished salad:
Cabbage is usually kneaded and packed into a jar, but I wanted a less laborious thing that would work as a salad, so I made this. Surprisingly, it works - it's a pleasantly tangy flavour, as if you had added vinegar and a bit of sugar in it. Since it's not too labour-intensive, it's a great ferment for a first try - no big deal if it spoils!
People also ingested bacteria with almost every meal because things weren't washed as much as they are nowadays. Funnily enough, there are about an equal amount of bacterial cells in each of our bodies as there are human cells. So we're all 1/2 human and 1/2 bacterial! There are some new emergent theories nowadays that suggest that the lack of consumption of many strands of beneficial bacteria every day is an underlying cause of many a modern health problem. Here's a link to a book which I haven't read but which has a funny name (and good reviews, but I'm linking to it because of the name
) if you're interested in learning more.

Well I finally finished my recipes, and I am ready to share them with you lovely people! They are pretty image-heavy, so I am going to put each of them under a collapse for viewer pleasure.
I based each of these off of a food from my favorite fantasy game, Guild Wars 2! I hope some RPRers can appreciate some of the references I put in here


My family and I really enjoyed these recipes together! Even though they are picky, they loved everything I made. (for once)
Look at those huge nerds.
I hope you guys enjoy reading my recipes and even eating them, too, if you try!
I based each of these off of a food from my favorite fantasy game, Guild Wars 2! I hope some RPRers can appreciate some of the references I put in here
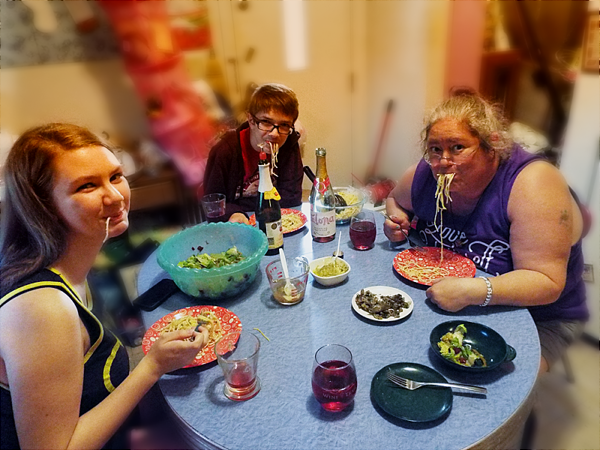
Bowl of Lemongrass Mussel Pasta
I started with a pretty simple recipe. GW2 recipes can get pretty complex as you factor in base ingredients, but this one doesn't have many steps.
You will need:
- Dry Pasta
- Mussels (I substituted a small can of oysters)
- Dried and crushed lemongrass
- Shredded mozzarella
- Butter
- Salt
I can't give you exact amounts of pasta that was used. I am italian. Make enough for what you feel will be eaten by you and your family. It will end up being enough to feed the neighbors, too.
Relatively this much.
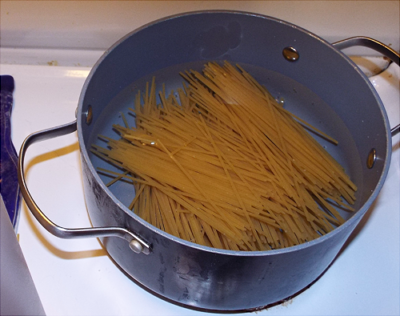
Boil it until your pasta is done, like you are making spaghetti but skip all those other parts. It is done when you taste it and it is completely soft or you throw a noodle against the wall and it sticks. The latter option is more fun.
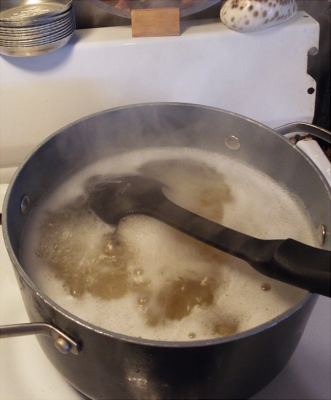
Done? Let's toss this whole pot and find out.
Once it is done drain your noodles and add butter and salt to taste. Also, add in about a tablespoon of lemongrass to taste (again this depends on how much pasta you used. Don't go overboard- it is a bit strong). I added in an extra ingredient here because I knew my family wouldn't eat just naked noodles. So I put in mozzarella cheese and left the pot on low until it was melted.
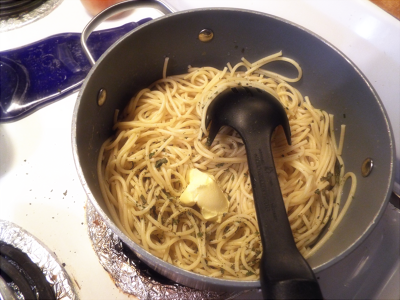
Cheese makes everything better.
Next, you gotta heat your mussels. I used canned oysters because I can't afford to be that fancy. I decided to put a little lemongrass on them, as well, and fry them. They don't exactly change color or anything so just cook them until they are hot. Canned oysters are already cooked, so you have nothing to worry about.
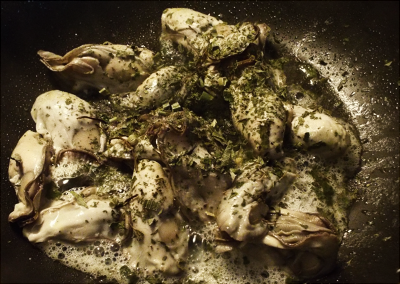
My "Mussels". Suns out, guns out.
Again, I know how picky my family is so I left the oysters off on the side so I could keep them all to myself. No shame.
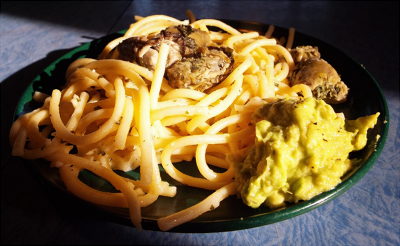
And it is done! A super easy and delicious meal for the whole family, provided they like mollusks.
I started with a pretty simple recipe. GW2 recipes can get pretty complex as you factor in base ingredients, but this one doesn't have many steps.
You will need:
- Dry Pasta
- Mussels (I substituted a small can of oysters)
- Dried and crushed lemongrass
- Shredded mozzarella
- Butter
- Salt
I can't give you exact amounts of pasta that was used. I am italian. Make enough for what you feel will be eaten by you and your family. It will end up being enough to feed the neighbors, too.
Relatively this much.
Boil it until your pasta is done, like you are making spaghetti but skip all those other parts. It is done when you taste it and it is completely soft or you throw a noodle against the wall and it sticks. The latter option is more fun.
Done? Let's toss this whole pot and find out.
Once it is done drain your noodles and add butter and salt to taste. Also, add in about a tablespoon of lemongrass to taste (again this depends on how much pasta you used. Don't go overboard- it is a bit strong). I added in an extra ingredient here because I knew my family wouldn't eat just naked noodles. So I put in mozzarella cheese and left the pot on low until it was melted.
Cheese makes everything better.
Next, you gotta heat your mussels. I used canned oysters because I can't afford to be that fancy. I decided to put a little lemongrass on them, as well, and fry them. They don't exactly change color or anything so just cook them until they are hot. Canned oysters are already cooked, so you have nothing to worry about.
My "Mussels". Suns out, guns out.
Again, I know how picky my family is so I left the oysters off on the side so I could keep them all to myself. No shame.
And it is done! A super easy and delicious meal for the whole family, provided they like mollusks.
Bowl of Black Pepper Cactus Salad
This recipe turned out to be quite a bit more complex than the first. Yeah, I know. A complex salad? Must be a sylvari thing.
You will need:
- Pepper
- Salt
- Oregano
- Basil
- Parsley
- Thyme
- Apple Cider Vinegar
- Vegetable Oil
- Beets
- Lettuce
- Avocado
- Nopals (cactus paddles)
What makes this recipe complicated is that I decided to make it from its base ingredients. In game, if you were to craft this recipe, it would go something like this:
Craft a thing. Now craft a different thing. Put two things together to make new thing. Put new thing and 2 other ingredients together to make new-new thing. New-new thing plus more ingredients and finally you have a salad! Yeah, I am confused, too. So I will break it down into each of its parts!
Bottle of Ascalonian Dressing
Ascalon is an area ravaged by war and dragon corruption. Many humans used to live in the area, which is where I like to think Ascalonian salad came from, with its recipe handed down through families that escaped to Kryta. To start off your Ascalonian salad, you first must have Ascalonian dressing!
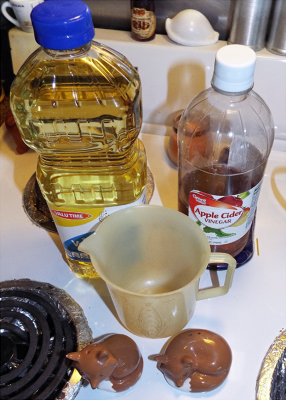
My foxes are ready.
Start off by making simple dressing, first. For this you will need salt and pepper, vegetable oil, and apple cider vinegar. I mixed my dressing in a measuring cup, but if you want to make more than that you can put it in a bottle.
The majority of your dressing will be vegetable oil, with the vinegar for taste. Put about 2 tablespoons of vinegar for every half cup of oil, then stir to mix. Add a teaspoon each of salt and pepper.
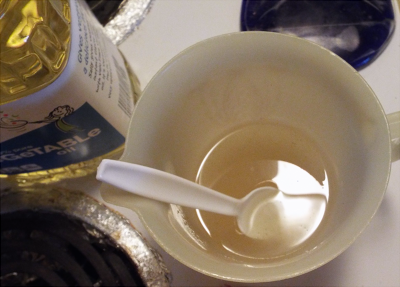
It won't look appetizing until later.
Once you have your simple dressing, you need to give it that Ascalonian flare with Ascalon's favorite herbs.
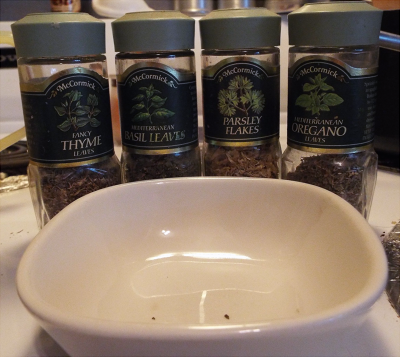
Conveniently, they are also herbs we like here on earth.
In a separate bowl I mixed a teaspoon each of Thyme, Basil, Parsley, and Oregano. You might have to increase your herbs if you make more dressing than I did.
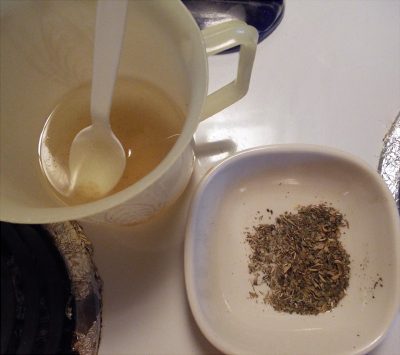
Is it supposed to look delicious yet?
Mix them together and your Ascalonian Dressing is done! In game, you would put this directly into lettuce to craft a salad, but here in normal-land we let everyone put on their own dressing, so set it off to the side for now.
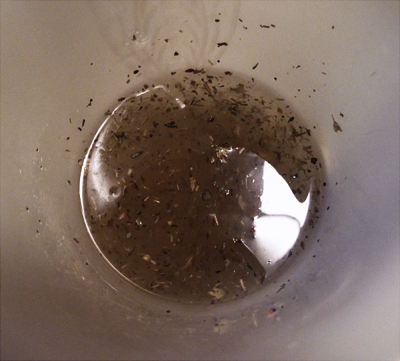
If it looks like the trash compactor from Star Wars inside a fish bowl you did it right.
I MAY have also added a beef bouillon cube for flavor/color. I don't remember. But now you have the idea for later.
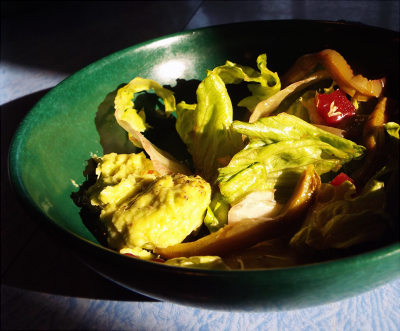
Bowl of Ascalonian Salad
The ingredients for an Ascalonian salad are simple: Your Ascalonian dressing, lettuce, and beets. But, as I said, I will be adding the dressing last. Chop your lettuce and beets to your preferred size and throw them in a bowl.
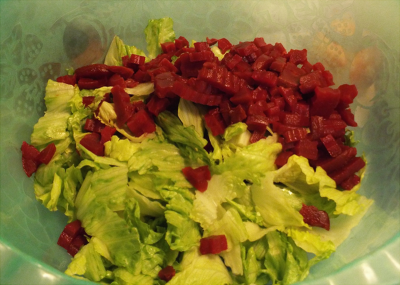
This was the easiest part of the whole salad.
Bowl of Black Pepper Cactus Salad
Wow, could it be? We have finally crafted ALL the ingredients necessary for our intended salad? Yep. Go you! For the last step grab your avocado, pepper, and nopals.
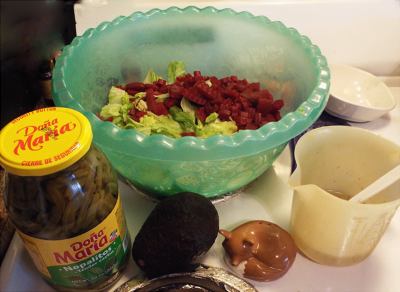
It's almost eat time! Yay!
Nopals can be bought from nearly any store with Mexican foods. I bought this jar called "Nopalitos", but it is spicy because there is a jalapeno inside. Even after you remove the jalapeno and onions and rinse off the nopals it will still be a bit spicy, so if you want no spice at all you need to look for the raw paddles at a specialty store and chop them. If you are unsure if you will like the taste of nopals, I can tell you they taste a lot like green beans. They are really good!
Add in your nopals and pepper, then crush your avocado and either put it directly in, or put it in a separate bowl if your family is lame and doesn't appreciate the deliciousness that is avocado.
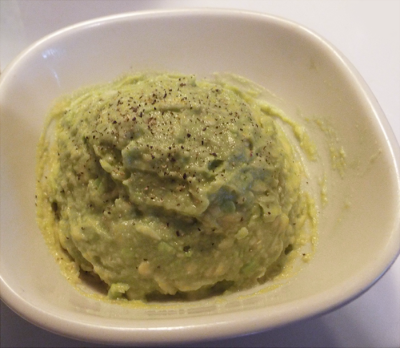
-drooling emoticon-
And now you are finally done! Congratulate yourself and devour it.
This recipe turned out to be quite a bit more complex than the first. Yeah, I know. A complex salad? Must be a sylvari thing.
You will need:
- Pepper
- Salt
- Oregano
- Basil
- Parsley
- Thyme
- Apple Cider Vinegar
- Vegetable Oil
- Beets
- Lettuce
- Avocado
- Nopals (cactus paddles)
What makes this recipe complicated is that I decided to make it from its base ingredients. In game, if you were to craft this recipe, it would go something like this:
Craft a thing. Now craft a different thing. Put two things together to make new thing. Put new thing and 2 other ingredients together to make new-new thing. New-new thing plus more ingredients and finally you have a salad! Yeah, I am confused, too. So I will break it down into each of its parts!
Bottle of Ascalonian Dressing
Ascalon is an area ravaged by war and dragon corruption. Many humans used to live in the area, which is where I like to think Ascalonian salad came from, with its recipe handed down through families that escaped to Kryta. To start off your Ascalonian salad, you first must have Ascalonian dressing!
My foxes are ready.
Start off by making simple dressing, first. For this you will need salt and pepper, vegetable oil, and apple cider vinegar. I mixed my dressing in a measuring cup, but if you want to make more than that you can put it in a bottle.
The majority of your dressing will be vegetable oil, with the vinegar for taste. Put about 2 tablespoons of vinegar for every half cup of oil, then stir to mix. Add a teaspoon each of salt and pepper.
It won't look appetizing until later.
Once you have your simple dressing, you need to give it that Ascalonian flare with Ascalon's favorite herbs.
Conveniently, they are also herbs we like here on earth.
In a separate bowl I mixed a teaspoon each of Thyme, Basil, Parsley, and Oregano. You might have to increase your herbs if you make more dressing than I did.
Is it supposed to look delicious yet?
Mix them together and your Ascalonian Dressing is done! In game, you would put this directly into lettuce to craft a salad, but here in normal-land we let everyone put on their own dressing, so set it off to the side for now.
If it looks like the trash compactor from Star Wars inside a fish bowl you did it right.
I MAY have also added a beef bouillon cube for flavor/color. I don't remember. But now you have the idea for later.
Bowl of Ascalonian Salad
The ingredients for an Ascalonian salad are simple: Your Ascalonian dressing, lettuce, and beets. But, as I said, I will be adding the dressing last. Chop your lettuce and beets to your preferred size and throw them in a bowl.
This was the easiest part of the whole salad.
Bowl of Black Pepper Cactus Salad
Wow, could it be? We have finally crafted ALL the ingredients necessary for our intended salad? Yep. Go you! For the last step grab your avocado, pepper, and nopals.
It's almost eat time! Yay!
Nopals can be bought from nearly any store with Mexican foods. I bought this jar called "Nopalitos", but it is spicy because there is a jalapeno inside. Even after you remove the jalapeno and onions and rinse off the nopals it will still be a bit spicy, so if you want no spice at all you need to look for the raw paddles at a specialty store and chop them. If you are unsure if you will like the taste of nopals, I can tell you they taste a lot like green beans. They are really good!
Add in your nopals and pepper, then crush your avocado and either put it directly in, or put it in a separate bowl if your family is lame and doesn't appreciate the deliciousness that is avocado.
-drooling emoticon-
And now you are finally done! Congratulate yourself and devour it.
Bottle of Elonian Wine
You will need:
- 1 Can of concentrated cranberry juice
- 1 Bottle of Sparkling Apple-Peach Juice
- 1 Bottle of red wine of choice
There is no recipe in-game for Elonian wine, so this one I had to make with my own imagination of what it would taste like. Elona is a desert-like continent, with people of many cultures inhabiting it based on Africa and it's vastly differing societies. This wine, I imagined, would be sweet yet tart. Partially because I love sweet wine, but Elona feels like a place with many suprises and a hidden bite. So, what more perfect way to represent that than with cranberries?
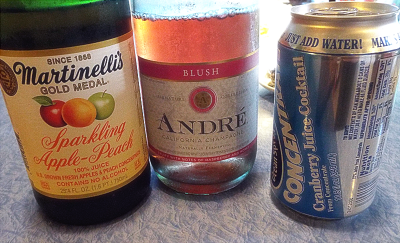
I chose the wine for this because it is an extra terrible one we wouldn't drink on its own (later I realized it was actually champagne, but it is similar enough). So this recipe is great for rescuing that cheap wine you bought that no one is drinking. The ratio I used was:
2 parts wine - 1 part apple-peach juice - cranberry juice to taste
I put maybe a third amount of cranberry than I did juice, but the concentration can get pretty strong so add it in slowly.

And here it is, after getting agorgeously handcrafted new label. I even made a virgin for the kiddos! (the same but without the alcohol)
You will need:
- 1 Can of concentrated cranberry juice
- 1 Bottle of Sparkling Apple-Peach Juice
- 1 Bottle of red wine of choice
There is no recipe in-game for Elonian wine, so this one I had to make with my own imagination of what it would taste like. Elona is a desert-like continent, with people of many cultures inhabiting it based on Africa and it's vastly differing societies. This wine, I imagined, would be sweet yet tart. Partially because I love sweet wine, but Elona feels like a place with many suprises and a hidden bite. So, what more perfect way to represent that than with cranberries?
I chose the wine for this because it is an extra terrible one we wouldn't drink on its own (later I realized it was actually champagne, but it is similar enough). So this recipe is great for rescuing that cheap wine you bought that no one is drinking. The ratio I used was:
2 parts wine - 1 part apple-peach juice - cranberry juice to taste
I put maybe a third amount of cranberry than I did juice, but the concentration can get pretty strong so add it in slowly.
And here it is, after getting a
My family and I really enjoyed these recipes together! Even though they are picky, they loved everything I made. (for once)
Look at those huge nerds.
I hope you guys enjoy reading my recipes and even eating them, too, if you try!
The fourth (and final!) part in my series on forgotten ingredients is about the superfoods of the old times!
What would your average warrior, expectant mother or convalescing person be eating to retain their strength, endurance, cognitive abilities and overall health?
Trigger warning: If you are against eating animals, you may want to skip to the last paragraph. Like, seriously.
Because the short answer is that they'd be eating offal.
It was commonly believed that if an organ of yours is ailing, you need to eat a lot of the same organ for yours to get better. So if you had trouble with joints, you'd eat the cartilage from joints, as well as bone broths. Expectant mothers would eat eggs, among other things. Many, many eggs - even 10 per day. If you had trouble with kidneys, well, you've probably guessed it - it's kidneys for you. Blindness caused by vitamin A deficiency could be cured by eating the eyes and surrounding tissues of fish.
But there are two organs that really stand out as some of the most potent superfoods ever. The first one is liver - did you know that it contains some still unidentified substances that significantly boost endurance? In an experiment with rats where it made up 10% of their daily food intake, it increased endurance by 750%!
Raw is best, and it was common in many places that the hunter who killed the animal had the privilege of eating the liver then and there. I doubt he managed to consume the whole thing, but the point is clear - it's a very valuable part of the animal. It's also easy to eat raw (unlike the heart) because liver is not a muscle and therefore it's soft. It's important to note that the hunters were able tell the health of the animal, and wouldn't eat the liver if showed signs of health problems. This is impossible to discern with store-bought livers, so I wouldn't recommend eating those raw!
But liver is not the best superfood out there. The first place goes to bone marrow! Did you know that many predators go for bone marrow first after they make a kill - that is they go for it as quickly as they can get to it - and they often go to great lengths to extract it? Many cultures still consider it a very nutritious food nowadays, and it certainly used to be the case in Europe in the old times, but these days it often gets almost ignored in many areas of the world. Which is sort of convenient, because that means you can buy it pretty cheaply. It definitely wasn't as comparatively cheap in the old times, though, because it was recognised as a very nutritious food and it was very popular! The same often went for offal.
Today, research shows that consuming bone marrow helps improve brain function, maintain healthy bones, support immune systems and speed up the healing process of any injury or fracture. It's great for developing kids and women who wish to conceive, as well as ailing elders. Due to the nutrients it contains, it helps with cell oxygenation and with red and white blood cell formation.
When you're eating a broth made of bones, you also consume collagen, which is also awesome for nourishing skin, joints and other important body parts. So it's no wonder that bone broth was often consumed in many many societies around the world.
The unfortunate thing about offal is that most people (myself included) find it unappetising. So I came up with tricks to get the stuff into my diet, and I want to give you a bone marrow recipe (and two bonus recipes for your leftover marrow and bones). But first, let's learn how to get the stuff out of bones.
How to get bone marrow out of the bones
You put the bones (mine were beef, which is most common) in a baking dish and bake it at 220 degrees C for 20 minutes. Or, if you don't have an oven, it's also possible to cook it at a low temperature. I used an electric pot and set it to 90 C for 55 minutes and then 120 C for 15 minutes. The most important thing is that the marrow doesn't end up staying raw in the middle of the bones.
Now that you have some bone marrow (the amount in the picture is from 2 kg or 4 pounds of bones), you can get to cooking with it! Or you could just eat it warm with sourdough bread and a small salad.
Upside-down flaugnarde made with bone marrow
It's a cake packed with superfoods - bone marrow, butter, eggs, and cinnamon. Plus it's utterly delicious!
Adapted from this recipe.
Ingredients:
1/2 cup of bone marrow (you'll need about 1-2 lb of bones to get this amount)
2 Tbsp ghee
3 Tbsp honey
4 medium eggs (you can also use 3 eggs + 2 egg whites)
2 Tbsp coconut butter (if you don't want to go hunting for or making the very delicious coconut butter, you can simply leave it out, leave out the 3 Tbsp of water, and use 1/3 yogurt instead)
3 Tbsp water
1 tsp vanilla extract
2 tsp cinnamon
3 Tbsp coconut flour
a pinch of salt
3 medium apples or pears, peeled and cut in wedges
Special equipment:
Immersion blender
Baking dish
Method:

And not upside down, which probably isn't nearly as appetising:

But remember, it's full of superfoods! It's also utterly delicious
Also, please note that the baking times aren't tested because I don't have an oven. I use something like this for baking - it takes about 40 minutes at the 115 C setting to make the cake.
I had a lot of leftover bone marrow. What to do with it?
Marrow butter!
You'll need enough butter to make the bone marrow palatable for you. This can be a little but it can also be a lot. I'm using about 2 parts butter to 1 part bone marrow. Then, you'll need some herbs (fresh or dried) and some salt. I like rosemary and thyme. Finally, you can add some garlic.
Special equipment: You'll need a small-volume food blender. If you use a regular-sized one the blades won't be able to catch everything, since you won't usually be making a big amount of the butter.
Method:
Throw the garlic and the herbs into your blender and chop them up. Then, add the softened butter and the bone marrow. Plus the salt. Process until smooth. Refrigerate.
This is an excellent addition to soups and stews. You can melt it over anything, just like herb butter.
If you need a more step-by-step recipe, you can look at the original here: http://www.mommypotamus.com/bone-marrow-butter/ I modified the amounts and the herbs somewhat, but the recipe is super flexible and you can basically throw anything you fancy into it, within reason.

And what to do with the leftover bones? Bone broth! I'm just going to link you to a recipe here.
So, yeah. Bone marrow. One of the best superfoods out there.
It's really important to use offal from animals that were as healthy as possible, which means grass-fed cows and sheep, organic pigs etc. Fatty tissues are used to store toxins within animals' bodies, so I wouldn't be too inclined to eat non-grass-fed bone marrow because it's over 90% fat.
A bonus forgotten superfood is making its appearance in this last paragraph, because is was a very widely used spice during the middle ages in and around Germany... And now nobody even knows it exists! It's called bertram, akarkara, or pellitory - a simple powder made from a dried root from a plant that looks nothing special, it was said to be able to restore both digestive and overall health and prevent healthy people from falling ill. The taste is neutral and it pairs well with meats and soups.
What would your average warrior, expectant mother or convalescing person be eating to retain their strength, endurance, cognitive abilities and overall health?
Trigger warning: If you are against eating animals, you may want to skip to the last paragraph. Like, seriously.
Because the short answer is that they'd be eating offal.
It was commonly believed that if an organ of yours is ailing, you need to eat a lot of the same organ for yours to get better. So if you had trouble with joints, you'd eat the cartilage from joints, as well as bone broths. Expectant mothers would eat eggs, among other things. Many, many eggs - even 10 per day. If you had trouble with kidneys, well, you've probably guessed it - it's kidneys for you. Blindness caused by vitamin A deficiency could be cured by eating the eyes and surrounding tissues of fish.
But there are two organs that really stand out as some of the most potent superfoods ever. The first one is liver - did you know that it contains some still unidentified substances that significantly boost endurance? In an experiment with rats where it made up 10% of their daily food intake, it increased endurance by 750%!
Raw is best, and it was common in many places that the hunter who killed the animal had the privilege of eating the liver then and there. I doubt he managed to consume the whole thing, but the point is clear - it's a very valuable part of the animal. It's also easy to eat raw (unlike the heart) because liver is not a muscle and therefore it's soft. It's important to note that the hunters were able tell the health of the animal, and wouldn't eat the liver if showed signs of health problems. This is impossible to discern with store-bought livers, so I wouldn't recommend eating those raw!
But liver is not the best superfood out there. The first place goes to bone marrow! Did you know that many predators go for bone marrow first after they make a kill - that is they go for it as quickly as they can get to it - and they often go to great lengths to extract it? Many cultures still consider it a very nutritious food nowadays, and it certainly used to be the case in Europe in the old times, but these days it often gets almost ignored in many areas of the world. Which is sort of convenient, because that means you can buy it pretty cheaply. It definitely wasn't as comparatively cheap in the old times, though, because it was recognised as a very nutritious food and it was very popular! The same often went for offal.
Today, research shows that consuming bone marrow helps improve brain function, maintain healthy bones, support immune systems and speed up the healing process of any injury or fracture. It's great for developing kids and women who wish to conceive, as well as ailing elders. Due to the nutrients it contains, it helps with cell oxygenation and with red and white blood cell formation.
When you're eating a broth made of bones, you also consume collagen, which is also awesome for nourishing skin, joints and other important body parts. So it's no wonder that bone broth was often consumed in many many societies around the world.
The unfortunate thing about offal is that most people (myself included) find it unappetising. So I came up with tricks to get the stuff into my diet, and I want to give you a bone marrow recipe (and two bonus recipes for your leftover marrow and bones). But first, let's learn how to get the stuff out of bones.
How to get bone marrow out of the bones
You put the bones (mine were beef, which is most common) in a baking dish and bake it at 220 degrees C for 20 minutes. Or, if you don't have an oven, it's also possible to cook it at a low temperature. I used an electric pot and set it to 90 C for 55 minutes and then 120 C for 15 minutes. The most important thing is that the marrow doesn't end up staying raw in the middle of the bones.
Pictures!


Now that you have some bone marrow (the amount in the picture is from 2 kg or 4 pounds of bones), you can get to cooking with it! Or you could just eat it warm with sourdough bread and a small salad.
Upside-down flaugnarde made with bone marrow
It's a cake packed with superfoods - bone marrow, butter, eggs, and cinnamon. Plus it's utterly delicious!
Adapted from this recipe.
Ingredients:
1/2 cup of bone marrow (you'll need about 1-2 lb of bones to get this amount)
2 Tbsp ghee
3 Tbsp honey
4 medium eggs (you can also use 3 eggs + 2 egg whites)
2 Tbsp coconut butter (if you don't want to go hunting for or making the very delicious coconut butter, you can simply leave it out, leave out the 3 Tbsp of water, and use 1/3 yogurt instead)
3 Tbsp water
1 tsp vanilla extract
2 tsp cinnamon
3 Tbsp coconut flour
a pinch of salt
3 medium apples or pears, peeled and cut in wedges
Special equipment:
Immersion blender
Baking dish
Method:
- Butter a glass dish. You want the diameter or side length to be around 20 cm or 7-8 in.
- In a pot, melt the ghee and the bone marrow over low heat. Stir in the honey, then the coconut butter. Turn off the heat. Stir until everything except the marrow has melted together - you'll need a blender to get rid of the marrow chunks.
- Allow your mixture to cool. While you do that, peel your apples (or pears), cut them into wedges and cover the bottom of your buttered dish with them.
- When the mixture is cool enough not to damage your eggs (around 40 C is fine - it should feel just a little warm), put the rest of the ingredients into the pot. The order of that is irrelevant because the next step is to blend everything together!
- Using the immersion blender, blend it all. This is mainly to blend the bits of bone marrow into a smooth paste.
- You should get a dough that pours well - pour it over your apples and put in a pre-heated oven. Bake at 160 C or 325 F until the centre is set. It will rise during baking! So your dish shouldn't be too low.
- It's best served cold, just like a good revenge.
And not upside down, which probably isn't nearly as appetising:
But remember, it's full of superfoods! It's also utterly delicious
Also, please note that the baking times aren't tested because I don't have an oven. I use something like this for baking - it takes about 40 minutes at the 115 C setting to make the cake.
I had a lot of leftover bone marrow. What to do with it?
Marrow butter!
You'll need enough butter to make the bone marrow palatable for you. This can be a little but it can also be a lot. I'm using about 2 parts butter to 1 part bone marrow. Then, you'll need some herbs (fresh or dried) and some salt. I like rosemary and thyme. Finally, you can add some garlic.
Special equipment: You'll need a small-volume food blender. If you use a regular-sized one the blades won't be able to catch everything, since you won't usually be making a big amount of the butter.
Method:
Throw the garlic and the herbs into your blender and chop them up. Then, add the softened butter and the bone marrow. Plus the salt. Process until smooth. Refrigerate.
This is an excellent addition to soups and stews. You can melt it over anything, just like herb butter.
If you need a more step-by-step recipe, you can look at the original here: http://www.mommypotamus.com/bone-marrow-butter/ I modified the amounts and the herbs somewhat, but the recipe is super flexible and you can basically throw anything you fancy into it, within reason.
And what to do with the leftover bones? Bone broth! I'm just going to link you to a recipe here.
And give you a picture of my broth in the making.

So, yeah. Bone marrow. One of the best superfoods out there.
It's really important to use offal from animals that were as healthy as possible, which means grass-fed cows and sheep, organic pigs etc. Fatty tissues are used to store toxins within animals' bodies, so I wouldn't be too inclined to eat non-grass-fed bone marrow because it's over 90% fat.
A bonus forgotten superfood is making its appearance in this last paragraph, because is was a very widely used spice during the middle ages in and around Germany... And now nobody even knows it exists! It's called bertram, akarkara, or pellitory - a simple powder made from a dried root from a plant that looks nothing special, it was said to be able to restore both digestive and overall health and prevent healthy people from falling ill. The taste is neutral and it pairs well with meats and soups.
Bonus recipe! I modified this one to incorporate bone marrow - I used 300 ml of low-fat coconut milk + 100 ml of bone marrow in place of the can of coconut milk (which would be about 400 ml). Topped it off with cinnamon and honey.

Tips for cooking:
I'd recommend melting the bone marrow in the coconut milk if it had been refrigerated. Then add the bananas and use an immersion blender to blend it all. Once it's cool enough (it feels only warm, not hot), add the eggs and go on blending. Then, before pouring it into your jars, I strongly recommend straining it through a fine strainer. The marrow can contain bits of veins and the like, and they will be really visible in the custard if you leave them in.
I'd recommend melting the bone marrow in the coconut milk if it had been refrigerated. Then add the bananas and use an immersion blender to blend it all. Once it's cool enough (it feels only warm, not hot), add the eggs and go on blending. Then, before pouring it into your jars, I strongly recommend straining it through a fine strainer. The marrow can contain bits of veins and the like, and they will be really visible in the custard if you leave them in.
Whew! I have spent entirely too much time in the kitchen over the past four (five?) days, but I think this may have been worth it.
So, as a kind of continuation-in-theme of my last cooking contest entry (2014, I think?), I decided to do something on the subject of the RPR, and in particular, the site's birthday festivities of Epic Week.
And, of course, you can't have an Epic Birthday without Epic Cake.
 You could have normal cake. It would just be more on the order of small-case epic, instead of large-case Epic. An epyllion cake, if you will.
Um.
 We agree that this is possible in theory, but suggest that perhaps the Epic is an essential ingredient? We believe this requires more study. Our recommendation is eating additional cake.
Er...
 You enjoy yourselves. I am not interested unless it contains a thousand times the recommended daily intake of iron. Also, I do not have a mouth.
You guys! You're spoiling it!
Sorry!
Ahem. Presenting... Deep in Forum Forest, A Cake Lies Waiting.


See the full pictures at my DropBox!
The cake is decorated with fondant/gumpaste figurines, and depicts the trio of forest guardians that assisted us in battling back the Queen-Spider's forces this year. They're having a bit of rest and relaxation after all the excitement last month. Digesting the cake from the party, and all.
The fondant came from a bucket - I do have a decent recipe for handmaking it, but it can be finicky with humidity and I was already a busy enough dragon! - but was hand-coloured with gel paste, and the figurines themselves were all hand-modeled by myself. The only non-edible bits on them are the Amethyst Golem's larger stones! Sorry, no, that's not rock candy. (Although, the inner bits of the geodes? Coarse purple sugar!) The figurines were finished with petal dust and lustre dust!
(Standard disclaimer: do not put non-eatable things on cakes if children are your target audience, and always warn folks before they eat, etc.)
But that's all just sugar substance. What about what's underneath?
I wanted to tie in the forest theme to the cake itself, as well, so I decided that nutty, earthy flavours would be the way to go about doing that. I started with three layers of a hybrid sponge/butter pistachio cake, filled between the layers with a chestnut and mascarpone cream, and iced the whole thing with a not-too-sweet cream cheese frosting before applying the fondant. Recipes follow below!
Party hat not required, but suggested!
So, as a kind of continuation-in-theme of my last cooking contest entry (2014, I think?), I decided to do something on the subject of the RPR, and in particular, the site's birthday festivities of Epic Week.
And, of course, you can't have an Epic Birthday without Epic Cake.
You could have normal cake. It would just be more on the order of small-case epic, instead of large-case Epic. An epyllion cake, if you will.Um.
We agree that this is possible in theory, but suggest that perhaps the Epic is an essential ingredient? We believe this requires more study. Our recommendation is eating additional cake.Er...
You enjoy yourselves. I am not interested unless it contains a thousand times the recommended daily intake of iron. Also, I do not have a mouth.You guys! You're spoiling it!
Sorry!Ahem. Presenting... Deep in Forum Forest, A Cake Lies Waiting.
See the full pictures at my DropBox!
The cake is decorated with fondant/gumpaste figurines, and depicts the trio of forest guardians that assisted us in battling back the Queen-Spider's forces this year. They're having a bit of rest and relaxation after all the excitement last month. Digesting the cake from the party, and all.
The fondant came from a bucket - I do have a decent recipe for handmaking it, but it can be finicky with humidity and I was already a busy enough dragon! - but was hand-coloured with gel paste, and the figurines themselves were all hand-modeled by myself. The only non-edible bits on them are the Amethyst Golem's larger stones! Sorry, no, that's not rock candy. (Although, the inner bits of the geodes? Coarse purple sugar!) The figurines were finished with petal dust and lustre dust!
(Standard disclaimer: do not put non-eatable things on cakes if children are your target audience, and always warn folks before they eat, etc.)
But that's all just sugar substance. What about what's underneath?
I wanted to tie in the forest theme to the cake itself, as well, so I decided that nutty, earthy flavours would be the way to go about doing that. I started with three layers of a hybrid sponge/butter pistachio cake, filled between the layers with a chestnut and mascarpone cream, and iced the whole thing with a not-too-sweet cream cheese frosting before applying the fondant. Recipes follow below!
Pistachio Cake
1 cup shelled, roasted pistachios (Throw in a 350 F oven for 4-6 minutes to roast, immediately remove to a plate to cool before using.)
3 cups all-purpose flour
1/4 cup cornstarch
1 tbsp baking powder
1 tsp baking soda
1/2 tsp salt
1 cup butter, softened
1-3/4 cups sugar
1 whole egg
1 tbsp vanilla
1-1/2 cups milk
3 egg whites, room temperature
1/4 tsp cream of tartar
Preheat oven to 350F/180C. Grease and flour three 8 or 9-inch cake pans.
Mix together flour, cornstarch, baking powder, baking soda, and salt. Set aside.
Grind the pistachios in a food processor or blender until coarsely chopped; add 2 tbsp of the chopped pistachios to your flour mix. Continue blending the rest of the pistachios until finely ground, and add them to the flour as well.
Cream the butter (or whip in a mixer with a paddle) until light. Add the sugar, and continue creaming/whipping until light and fluffy and fully incorporated. Beat in the whole egg and vanilla.
In alternating batches, add the dry ingredients and milk to the butter mixture - one third of the flour mixture to the butter mix and mix completely, scraping down the bowl as necessary, then add half of the milk and mix completely, followed by another third of the flour, and so on until fully incorporated.
In a seperate bowl, whip the egg whites with the cream of tartar until soft peaks form. Fold in about a third of the whites into the cake batter first, and then add the rest of the egg whites. Be gentle and careful not to deflate the whites too much.
Distribute the batter into your prepared cake pans, and smooth the tops. Bake until light golden and a toothpick comes out clean - anywhere from about 23-28 minutes for a 9" cake, or 26-32 minutes for an 8" one. Cool for 10 minutes on a rack in the pans, and then turn out to finish cooling completely.
Chestnut Cream Filling
8 oz chestnut cream/spread (I found mine in a Mediterranean grocery)
8 oz mascarpone
seeds from 1 vanilla bean (or 1 tsp vanilla extract)
pinch salt
1-1/4 cups heavy cream
1 tbsp sugar
Mash the chestnut cream and mascarpone together in the bottom of a mixing bowl. Add the vanilla seeds/extract, salt, cream, and sugar, and whip at a medium-high speed until the mixture holds a semi-stiff peak.
Cream Cheese Frosting
1-1/2 cups sugar
1/3 cup flour
1-1/2 cups milk
1/3 cup cream
3/4 cup butter, room temperature
6 oz cream cheese, room temperature
3 tbsp honey
1 tsp vanilla
Whisk sugar and flour together in a medium saucepan. Add the milk and cream slowly, whisking constantly. Cook over medium heat, stirring frequently, until the mixture thickens and begins to boil. Transfer to a casserole dish or bowl, cover with plastic wrap pressed against the top of the custard, and put in the fridge for four hours (or overnight) until cold. (If you get brown bits coming up from your pot, because you were a forgetful silly-person and forgot to stir (like me), just strain the mixture as you're putting it in your bowl.)
When ready to finish the frosting, beat the cold custard on low speed in a mixer (with a paddle, if possible). Add butter in small chunks at a time, and then add the cream cheese in the same manner. Increase the speed on the mixer and beat until smooth. Add honey and vanilla and mix in.
To assemble:
Level the tops of your cakes with a knife (a serrated bread knife works best). Place the bottom layer on a cake board or plate. Pipe a ring of icing around the outside of the cake, and fill the rest of the space with a layer of chestnut cream (this should be no more than a quarter-inch). Top with another cake layer, and repeat. Top with final layer. Ice the top and sides of the cake with a not-too-thick, even layer of frosting as a crumb coat. Freeze the cake for 30 minutes if putting fondant on, or refrigerate if just using the frosting. After this point, you can either top the cake with rolled fondant, or ice the cake smoothly using the rest of the cream cheese frosting. Decorate as desired!
Party hat not required, but suggested!
Oh wow! That looks epic, and I think I would love the taste of it based on the recipe!
Great entries everyone! This contest is officially closed! Winners to be contacted in a few days!
Winners to be contacted in a few days!
@heimdall
even better than i'd imagined! definitely bookmarking this thread for later, i have to try that wine! *u*
also, i spy a sneaky kitty!
even better than i'd imagined! definitely bookmarking this thread for later, i have to try that wine! *u*
also, i spy a sneaky kitty!
You are on: Forums » Art & Creativity » OFFICIAL CONTEST: Epic Cooking 2016